
I have included the map again on this page so that those of you that work on the web do not have to keep flicking back and forth between pages. Although I would strongly recommend that you print this tutorial off so that it is easier to follow.

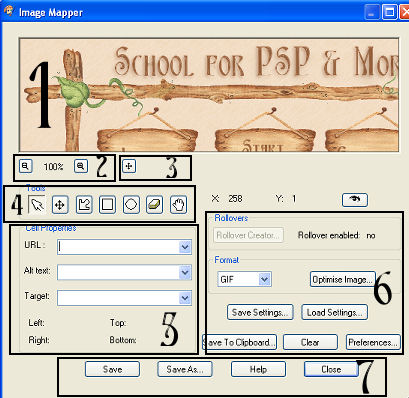
In Section 6 of our Map, under Format. Because the image we are using is a jpeg in the drop down select Jpeg. I have found so far if I save as a gif it pixellates the picture. But I am still exploring this as well ;) wink wink!!
We are going to save our image so that is can be opened at a later date if we need to rework on it.
This save must be done if you want to be able to rework the same picture. Only saving as an html file will not work.
In section 6 click save settings, save it to the same folder as your picture then its altogether in the one place.
Type a file name and then save.
To reload the settings:-
You would open the same image in PSP.
Go to file/export/Image mapper
In section 6 click on load settings
Go to folder and find your file name with the extension .JMP and click open.
You will now find all of your previous settings in Section 5 of our map - Cell Properties.

As we have been making our image map, we have also been producing html coding for our webpage. So we need to save this to our hard drive. Making sure we save it in the same folder as we have previously saved our picture and our .JMD file. If we keep everything together you will always know where to find it.
To save our image map as coding go to section 7 of our map and click on Save As (the first time we save) or Save (any subsequent saves for this particular file) this will open up our html save as dialogue box.
Navigate to the folder where you want to save and click ok.
If you use Html editors when making your webpages all you need to do at a later date is find the coding you just saved open it and copy and paste the code to wherever you want it placed inside your webpage.

I would only recommend using this feature if you have already done a full save as above in the last section. Save map settings to the clipboard is handy if you are already in the middle of working on your webpage and you are now ready to insert your image and coding .
In Section 6 click Save to Clipboard. This will open up a new box find where we have saved our original html file and click ok to open the image save as dialogue.
Go to the folder where you have saved your image and then click save.
Open your html file of your webpage and place the cursor where you would like to see your picture/image map and insert your coding by pressing CTRL P.
Wow that was one long tutorial!! I hope i have covered enough in this tutorial for you to be able to now understand Image mapping. If anybody has any queries please do not hesitate to contact me via my email button below.
If you have any queries or find any mistakes please dont hesitate to contact me:-

Please feel free to link to this tutorial, and/or print it out for your own personal use, but do not copy it in any way to put on-line, pass out, or re-write without my permission. Any resemblance to any other tutorial like this is purely coincidental.
Please respect my work by not claiming it as you own.
**NOTE--You may do anything you like with your results from these tutorials except make a profit from them. You got your results for free so let's keep it that way. Thank you! :o)
Created 20th October 2005. ©Copyright Tbab.co.uk
Property of Shelley Marlow
|
|
|
|