
Created 20th October 2005. ©Copyright Tbab.co.uk
Property of Shelley Marlow
This tutorial is written
and made in Psp Version 9 and assumes you have a working knowledge of Psp. It can be
made in earlier versions of Psp with a few adjustments, but for this tutorial I will
only be explaining how it was made in version 9.
You will need:-
JASC's PSP (free 30 day trial) which you can get here
My zipped files which you can get here
** save to your my documents and unzip
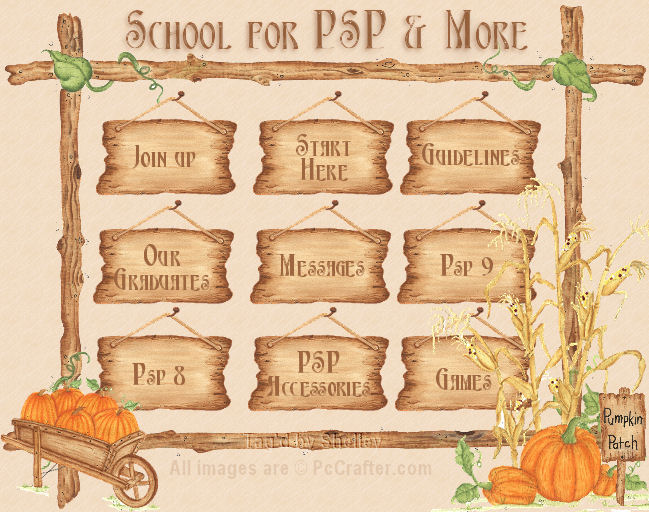
The picture is made up of several pictures that I purchased from PcCrafter.com If you would like to look at their work please visit them here. This picture is for tutorial purposes only and not to be duplicated, no watermarks or © to be removed.
An image map is a graphic that contains mapped areas that link to URL's. Today we will be using the picture in the zip file and making all of the headings workable links.
This tutorial will be graphic intensive. I will try and give you as many screenshots as I can to explain what I mean along the way. If at any point you get lost please feel free to email me using the link at the bottom of this page.
Let's get started:-
Unzip the file and open up in your psp workspace
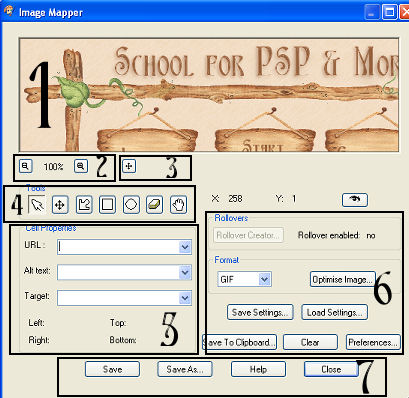
Go to File/Export/Image Mapper, a new window will open up as below
(From now on I will just produce screenshots from sections of the above picture to reduce loading time on the page, I have numbered the sections so that i can easily direct you.)

Number 1 - is our preview window - it may seem small but we can move our picture around
Number 2 - our zoom in and out buttons for us to be able to see our picture in the preview window
Number 3 - is our mover tool. When we click the icon a new window will appear but will only stay in view while your hold your mouse button down.
When the window appears if you move your mouse you will see that there is a black box inside the window as we move the mouse it moves the black box to select different areas of your picture.
Once you let go of your mouse you will see that in the preview window your view selection has changed to what you just chose with the mover tool
Number 4 - These are our selection tools to make our Cells/shapes on our picture to link. You will notice there is another move tool in there this serves a different purpose to our move tool at Number 3.
Number 5 - When we have created our individual cells this will be the cell property boxes
Number 6 - This is some more preferences and save settings buttons
Number 7 - The main save buttons for the pic which will help produce our html for the picture.

We need to move our picture in the top viewing screen so that we can see the first signs on our image eg. Join up, Start here and Guidelines.
Hold down the mover tool which is number 3 on our main picture above, NOT the mover tool that is in our tool box. When you keep the mover tool pressed down a new window will appear like so

While the mover tool is pressed down move , as you move your mouse you will see the black selection box moves. Move it so that all three of the first row of signs are in the selection box. Once your happy you can see all three in the black box let go of the mover tool. You will now see in our preview window that our picture has moved.
We need the above tools in order to create our map area.
Select the shape you would like to use, or that feel is appropriate to go with your picture.
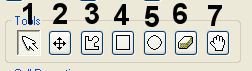
3 = Polygon Shape 4 = Rectangular tool 5= Circular tool
For the purposes of this tutorial and the picture we are using I would like you to select the Rectangular Tool
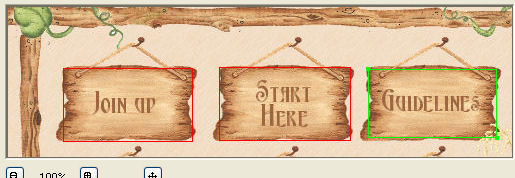
Place your mouse over our first sign (Join Up) you will see that your mouse changes to a cross and a square. I cannot show you a screenshot of this , unfortunately its one of those parts of psp that wont show up when we try to take a picture of it.
At this point your mouse will be like using the normal rectangle selection tool in psp. So drag a rectangle area over the top of the first sign.
You will notice you have a green outline. Now dont worry if you havent quite got all the area selected that you wanted to . Can you see there are a couple of nodes in the top left hand corner and in the bottom right hand corner this is so that we can edit the shape if we need to .
By selecting the pan tool (1) in our tool box and placing your mouse on one of the nodes you can make the rectangle smaller or larger.
By selecting the move tool (2) from our tool box we can move the rectangle that we have just created around.
By selecting the rubber (6) from our tool box and selecting one of the nodes it will erase the selection we have just made.
You only press the Clear button that is Section 6 of our main map above if you wish to clear all of the selections you have made so far.
Once your happy that you have the first selection (green box) in the correct position lets draw the next selection over the second sign (Start Here)
Make sure the selection tool is still selected. You will see as your drawing the selection that you have another selection area that is green, but as you let go of the mouse this area will remain green and the first selection we made will turn red. This now tells us that the red areas are selections already made and the green area is the current selected area that we can assign properties to. More of that in a moment.
Again once you are happy move on to your third sign (Guidelines) and do exactly the same as you have done above. You will again see that the first two selections you drew out are now red and the third one is green which is active.
Once you are happy you have the first row completed. Go back to our mover tool (Section 3 of our main map)and move the picture in your view window so that we can clearly see the second row of signs.
Continue as above until you have all 9 signs selected.
If you have any queries or find any mistakes please dont hesitate to contact me:-

Please feel free to link to this tutorial, and/or print it out for your own personal use, but do not copy it in any way to put on-line, pass out, or re-write without my permission. Any resemblance to any other tutorial like this is purely coincidental.
Please respect my work by not claiming it as you own.
**NOTE--You may do anything you like with your results from these tutorials except make a profit from them. You got your results for free so let's keep it that way. Thank you! :o)
Created 20th October 2005. ©Copyright Tbab.co.uk
Property of Shelley Marlow
|
|
|
|