Using Tubes to make a Tag
This tutorial was written by me on March 10th, 2008 and any
resemblance to other tutorials is purely coincidental.
You may use this tutorial for personal use only. Do not
distribute in other groups, post on a website or send
in email without express permission of me,
This is done in PSP XI but could probably be done
in other versions.
Please DO NOT script my tutorial.
For this tutorial you will need:
PSP XI or any other version. You can download a demo here.
Supplies :- which include an image which is © to sxc.hu - you may visit them here
a frame (if this belongs to you please contact me so that i may give
proper credit.)
a swirl (if this belongs to you please contact me so that i may give
proper credit.)
sky tube which is © Rainbow Coffi - you may visit them here
You can pick up the supplies here
Font - University Roman LET which you can get here
OK…ready? Let's get started! Please be sure to save often.
1. Open all four tubes in the supplies folder on to your area
2. Open a new image 500 x 500 transparent image
Flood fill with white
3. Maximise your V~Sky, Go to Edit/Copy
Back to your working image and Edit/Paste as a new layer
(Do not worry that the image is bigger than our working area, we want to leave it as it is
DO NOT RESIZE)
You may now close down V~Sky tube as we no longer require it.
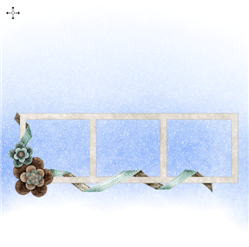
4. Maximise LJD.Spring Flurry Frame.
Go to Edit/Copy
Back to your working image and Edit/Paste as a new layer
Using your mover tool move down a little to just above the white section
at the bottom of your picture like this:-
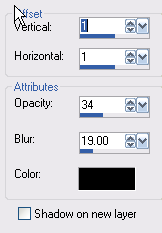
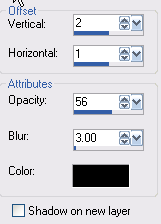
Go to Effects/3d Effects/Drop Shadow and use the following settings:-
You may now close the LJD.Spring Flurry Frame as we no longer require it
5. Maximise blue-power-mass.
Go to Edit/Copy
Back to your working image and Edit/Paste as a new layer
Layers/Arrange/Move Down (this will now move this mass underneath
the frame layer)
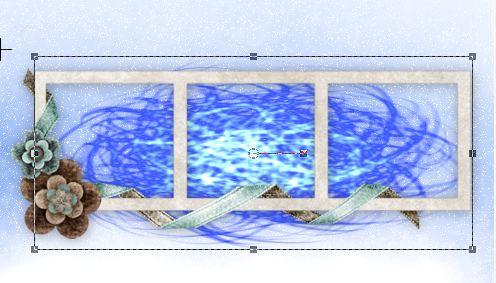
Using your Pick Tool (other versions will use Deformation tool)
Resize the mass about the same size as the frame. It should look
something like this:-
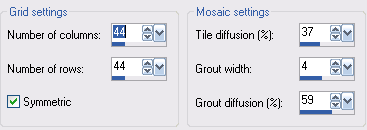
Go to Effects/Texture Effects/Mosiac-Antique
and use the following settings:-
In your layer pallette, make sure we are on the blue mass layer and reduce the opacity to about 40
You may now close the blue-power-mass as we no longer require it
6. In your layer pallette make sure we are on the top layer
Maximise bluejay-01. Go to Windows/Duplicate
Close the original and work on the duplicated copy
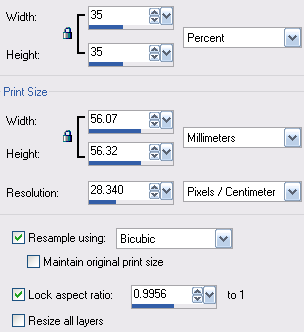
Go to Image/Resize and use the following settings:-
Go to Edit/copy
Back to our working image and Edit/Paste as a new layer
Using the move tool , move your bird into a position you like
on your frame or see my main picture above.
Go to Effects/3D Effects/Drop Shadow
use the same settings as we used on the frame
You may now close your duplicated copy of the bluejay-01 as we
no longer require it
7. Select your text tool.
Make your background colour #5d89e4
Turn your foreground colour off or null
use the following settings:-
In your layer pallette right click on your text layer and convert to raster layer
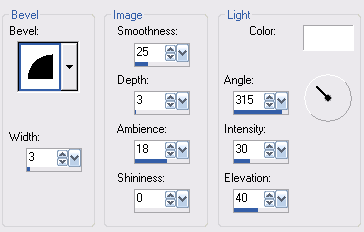
Go to Effects/3D effects/Inner Bevel
Go to effects/3d effects/Drop shadow
8. Select your crop tool and crop off the excess so you should be left with this
9. Go to Image/Add borders and add a 10 pixel border - border colour #5d89e4
Using your magic wand select the border
Effects/3d Effects/Inner Bevel
Use the same setings as earlier
Effects/3d effects/Drop Shadow and use the following settings
Make sure you put your watermark on your work
Please place any © information that is needed on to your work also
Save as jpg. You are all done!!!
We have now made a tag using tubes we already have on our computer.
I hope you have enjoyed this tutorial.
If you have any comments or questions, please email me here.
Copyright © 2008 Shelley Marlow
All Rights Reserved