Created 3rd May 2007. ©Copyright Tbab.co.uk
Property of Shelley Marlow
This tutorial is written
and made in Psp Version XI and assumes you have a working knowledge of Psp. It can be
made in earlier versions of Psp, but for this tutorial I will
only be explaining how it was made in version XI.
You will need:-
Corel's PSP (free 30 day trial) which you can get here
Supplies - In my supplies zip is the font and the mask you can download them here
I did not make the mask myself, but have used one that came as part of Psp8
Tube of choice. Please respect artists work by only using images that you have permission to use.
I have used a tube by J.Rett you can purchase her work here
Plugins - VM Distortion - Tiles a GoGo here
Eyecandy5 - Impact here
Let's get started:-
Open a new image 400 x 400 transparent image
Flood fill with White
Select two colours from the tube you will be using for your foreground and background colours. With the tube I used i chose the following colours:- foreground FC8524 and background EFCA21
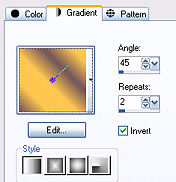
On your background colour make it into a gradient using Foreground/Background -Linear Angle 45 Repeats 2
Create a new layer and flood fill with the gradient.
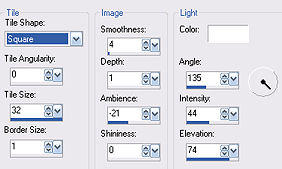
Go to 3d Effects/Textures/Tiles and use the following settings
Then apply VM Distortion/Tiles-a-go-go reduce the layer opacity to 22.
Go to layers /Load save mask/Load mask from disk. Select Mask 017

Right click on layer and merge group. Reduce the layer opacity to 22
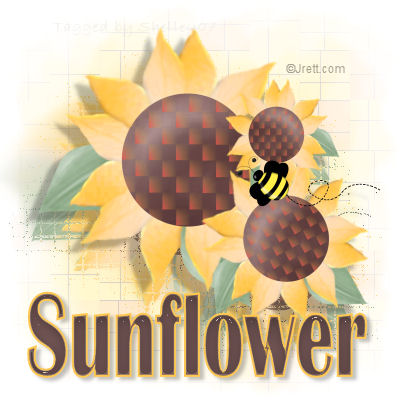
Open your tube. Copy and paste as a new layer into your working image. Close the original tube down
Duplicate the layer.
Turn off the duplicated layer and work on the layer which is the tube layer.
Go to effects/Texture effects/Mosiac glass using the following settings
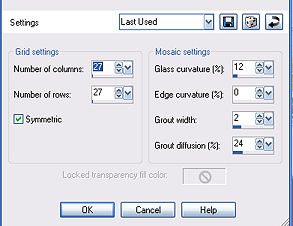
reduce the layer opacity to 79
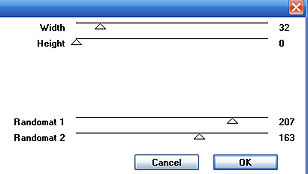
On the same layer go to eyecandy5/Impact/Motion Trail
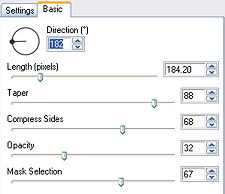
If you dont have Eyecandy5 you can always use Eyecandy4 and play with your settings, these are the settings I came up with.
Unhide your top tube layer
Using your mover tool move up a little
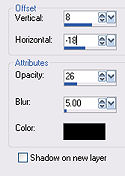
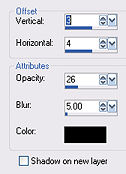
Add a drop shadow of
With your Text tool , select font Britannic Bold. Foreground colour FFC74F
Background colour 785A59 or use two colours out of your tube. Stroke Width 2
Convert to a raster layer
With your magic wand set at Add, RGB Value , Tolerance 12 click the inside colour of your Text.
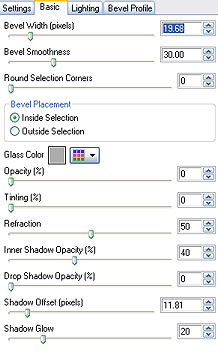
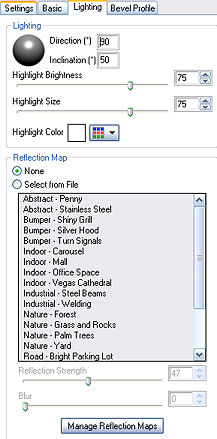
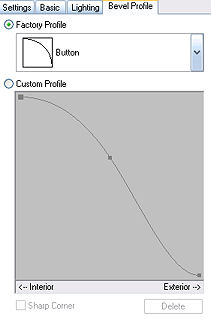
Go to effect, plugins, eyecandy5/impact/glass
Selections/select none
Add a drop shadow
Add any © information that you need to add for tube used and add your watermark.
If you have any queries please dont hesitate to contact me:-

Please feel free to link to this tutorial, and/or print it out for your own personal use, but do not copy it in any way to put on-line, pass out, or re-write without my permission. Any resemblance to any other tutorial like this is purely coincidental.
Please respect my work by not claiming it as you own.
**NOTE--You may do anything you like with your results from these tutorials except make a profit from them. You got your results for free so let's keep it that way. Thank you! :o)
Created 3rd May 2007. ©Copyright Tbab.co.uk
Property of Shelley Marlow
|
|