
Created 26th October 2004. ©Copyright Tbab.co.uk
Property of Shelley Marlow
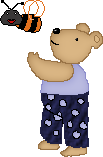
Today we will be making just the teddy in the above picture. The bee in the above picture
is a creation by Lura at PSP Crossroads and her tutorial can be found here
This tutorial is written
and made in Psp Version 8 and assumes you have a working knowledge of Psp. It can be
made in earlier versions of Psp with a few adjustments, but for this tutorial I will
only be explaining how it was made in version 8.
You will need:-
JASC's PSP (free 30 day trial) which you can get here
My zipped files (colour chart and outline chart) which you can get here
** save to your my documents and unzip
Let's get started:-
Step One
Open a new canvas 200 x 200, transparent background, 16 million pixels.
If you wish you can flood fill this layer with white so that you can see a little better and then create another layer to draw onto.
What I like to do is create a new layer and then blow my canvas up to 800%.
Yes this will seem very large, but I find it easier to be able to see what im doing, and move the canvas around as I go along.
Set your paintbrush to size 1 and set your colour to black #000000.
I like to use black so that I can see clearly what I am doing.
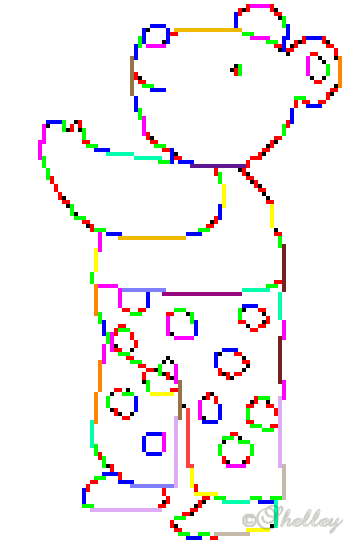
Then follow the outline below.
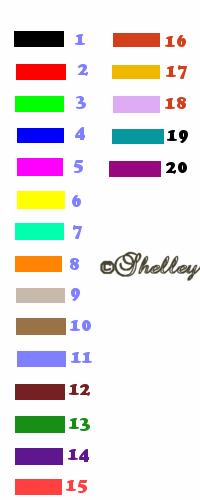
I was taught to do pixels following a colour chart, it really is the most simplest way, so I will also provide you with a colour chart also .
The colour will will be equivalent to the amount of pixels used.


Now we have our outline done, please feel free to colour and shade as you wish. Alternatively,
you may wish to follow the rest of the tutorial.
Before I continued with the rest of the tutorial i went over the outline I had already done,
The colour i used for head, ear,inner ear, arm and feet was #997346.
The outside of his nose, eye and crease in his trousers I left as black
The outside of his shirt I used #8D8ECB
The outside of his trousers I used #1F2043
Alternatively you can leave as black and continue, your choice entirely.
Step Two
Using your magic wand select the inside of the head.
Flood fill with #DAB684
Go to selections/Float
Go to effects/3d effects/cut out and use the following settings
Vert/Horiz both at 1, Opacity = 70, Blur = 12
Shadow colour #997346
Step Three
Using the magic wand select the inside of the ear.
Flood fill with #DAB684
Go to selections/Float
Go to effects/3d effects/cut out and use the following settings
Vert/Horiz both at 1, Opacity = 70, Blur = 7
Shadow colour #997346
Step Four
Using the magic wand select the inside of the arm.
Flood fill with #DAB684
Go to selections/Float
Go to effects/3d effects/cut out and use the following settings
Vert/Horiz both at 1, Opacity = 70, Blur = 12
Shadow colour #997346
Step Five
Using the magic wand select the inside of the inner ear.
Flood fill with #DAB684
Step Six
Using the magic wand select the inside of the nose
Flood fill with #000000
Go to effects/3d effects/inner bevel and use the round bevel setting.
Step Seven
Using the magic wand select the inside of the top part of body/shirt.
Flood fill with #BBBCE1
Go to selections/Float
Go to effects/3d effects/cut out and use the following settings
Vert/Horiz both at 1, Opacity = 70, Blur = 12
Shadow colour #8D8ECB
Step Eight
Using the magic wand select the inside of the trousers.
Flood fill with #1F2043
Go to selections/Float
Go to effects/texture effects/texture and use the following settings
Use denim texture , size 100%, smoothness-ambience and shininess 0, Depth 10,
colour white, angle 315, intensity 50 and elevation 30
Step Nine
Using the magic wand select the inside of the patches.
Flood fill with #BBBCE1
Go to selections/Float
Go to effects/3d effects/cut out and use the following settings
Vert/Horiz both at 1, Opacity = 70, Blur = 4
Shadow colour #8D8ECB
Step Ten
Using the magic wand select the inside of the feet.
Flood fill with #DAB684
Go to selections/Float
Go to effects/3d effects/cut out and use the following settings
Vert/Horiz both at 1, Opacity = 70, Blur = 12
Shadow colour #997346
There now we are all done, congratulations you now have a smart looking teddy dressed
for outdoor activities!!
If you have any queries or find any mistakes please dont hesitate to contact me:-

Please feel free to link to this tutorial, and/or print it out for your own personal use, but do not copy it in any way to put on-line, pass out, or re-write without my permission. Any resemblance to any other tutorial like this is purely coincidental.
Please respect my work by not claiming it as you own.
**NOTE--You may do anything you like with your results from these tutorials except make a profit from them. You got your results for free so let's keep it that way. Thank you! :o)
Created 26th October 2004. ©Copyright Tbab.co.uk
Property of Shelley Marlow
|
|
|
|