
Created 16th May 2005. ©Copyright Tbab.co.uk
Property of Shelley Marlow
Today we are going to make a photostrip like you would get in a booth.
This tutorial is written
and made in Psp Version 9 and assumes you have a working knowledge of Psp. It can be
made in earlier versions of Psp with a few adjustments, but for this tutorial I will
only be explaining how it was made in version 9.
You will need:-
JASC's PSP (free 30 day trial) which you can get here
My zipped file which contains the duck pictures. You can get it here
The ducks pictures remain my property as they are pictures of my fathers ducks.
Let's get started:-
Step One
Unzip the supplies folder , and then open all four duck pictures onto your workspace. Or you may use any pictures of your choice, but for them to work with this tutorial you must resize your own pictures to 128 x 96 pixels.
Step Two
Open a new image 150 x 444 pixels, raster background, 16 million colours, colour white.
Step Three
Go to File/Export/jpeg optimiser and save it as photostrip1.jpg
You will now have just a plain white strip.
Step Four
Still working on the white strip, we are now going to transfer our pictures of the ducks on to the plain image.
Add a new raster layer.
Selection tool - Rectangle - Custom Selection

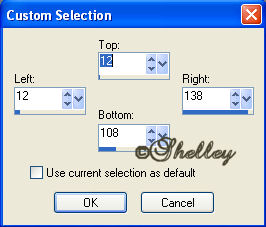
You should now have a selection of marching ants on your white image.
Step Five
Click on one of your duck images.
Go to Edit/Copy.
Go back to our white working image
Go to Paste/Paste into selection
Go to Selections/Select none
By using the custom selection method of placing our pictures onto the white background they will all be placed evenly.
Step Six
New Raster layer
Selection tool - custom selection as above
this time change the settings to:-
top - 120 bottom - 216 left and right leave as they are
Click on the second of your duck images
Go to Edit/Copy.
Go back to our white working image
Go to Paste/Paste into selection
Go to Selections/Select none
Step Seven
New Raster layer
Selection tool - custom selection as above
this time change the settings to:-
top - 228 bottom - 324 left and right leave as they are
Click on the third of your duck images
Go to Edit/Copy.
Go back to our white working image
Go to Paste/Paste into selection
Go to Selections/Select none
Step Eight
New Raster layer
Selection tool - custom selection as above
this time change the settings to:-
top - 336 bottom - 432 left and right leave as they are
Click on the fourth of your duck images
Go to Edit/Copy.
Go back to our white working image
Go to Paste/Paste into selection
Go to Selections/Select none
Step Nine
Merge all layers visible
Go to file/save as a psp image.
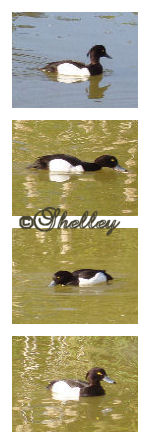
You should now have something like this
Step Ten
Go to file/jasc software products/launch animation shop
Animation Wizard
Same size as the first image frame - Next
Transparent - next
Upper left hand corner of frame - With preceding frames contents - next
Play it 5 times (in the real world a picture only develops once!! but so we can see it in the group we need you to play it 5 times)
100 secs - next
Add the two images that we just made making sure you select the plain white one first, the second one being the final image with all the ducks on it. - Next
Finish
Step Eleven
If you was to play the animation now you will see that it is just leaping from one image to another. What we want to do is make the picture look like its slowly developing.
Go to Effects/Insert Image Transition and use the following settings
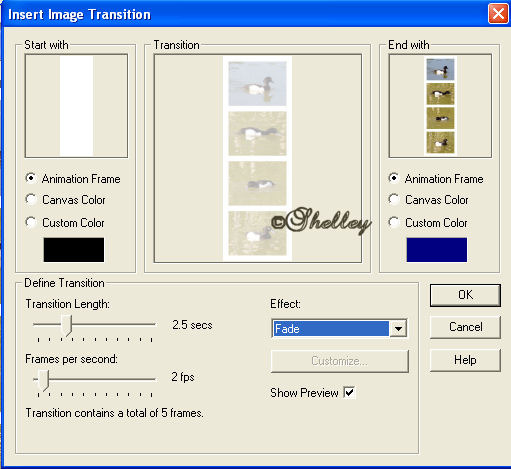
Now save your animation
For group tutorial purposes please use the materials provided and dont forget to put your name on using the text tool before posting to your group.
If you have any queries please dont hesitate to contact me:-
Please feel free to link to this tutorial, and/or print it out for your own personal use, but do not copy it in any way to put on-line, pass out, or re-write without my permission. Any resemblance to any other tutorial like this is purely coincidental.
Please respect my work by not claiming it as you own.
**NOTE--You may do anything you like with your results from these tutorials except make a profit from them. You got your results for free so let's keep it that way. Thank you! :o)
Created 16th May 2005. ©Copyright Tbab.co.uk
Property of Shelley Marlow
|
|
|
|