Created 13th January 2008. ©Copyright Tbab.co.uk
Property of Shelley Marlow
This tutorial is written
and made in Psp Version XI and assumes you have a working knowledge of Psp. It can be
made in earlier versions of Psp with a few adjustments, but for this tutorial I will
only be explaining how it was made in version XI.
You will need:-
Corel's PSP (free 30 day trial) which you can get here
Supplies zip file which you can get here
Included in the kit is:-
Pink background supplied by Scrappy Expressions which you can visit here
Ribbon and heart on chain psp images by Shelley at Tbab here
Font - Curlz MT
Tube of choice. Please respect artists work by only using images that you have permission to use.
I have used a tube by Joel Adams you need a licence to use his work which you can purchase here
Alien Skin EyeCandy 5 Impact - which you can get here
Let's get started:-
Open up Becky_Mask013 , Paper 4, font - Curlz Mz and the smnbn-heartonchain.pspimage from the supplies folder into your Psp
Open a new transparent image 500 x 380 pixels
Flood fill with white
Open a new raster layer
Flood fill with #cf6e8d
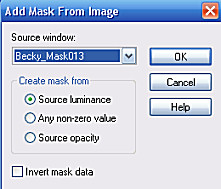
Go to Layers/New mask layer/from image
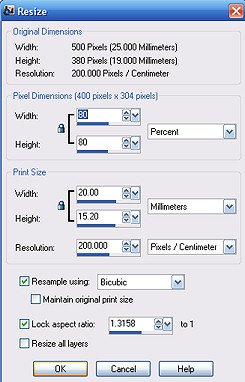
In your layer palette click on Group - Raster 2 layer, right click and Merge/merge group. Staying on the same layer, go to Image/Resize by 80% , Bicubic and resize all layers unchecked.
With your magic wand using settings

Now select each of the letters of the word naughty like so

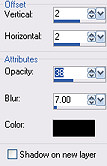
Go to effects/3d effects/dropshadow
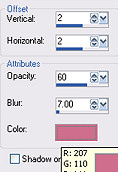
Vertical/horizontal 2, Opacity 60, Blur 7, Colour #cf6e8d
Selections/ select none
Set you background colour to pattern - paper 4 - Angle 0 scale 100
Set your foreground colour to #cf6e8d
Using your preset shape tool - shape - Heart1
Drag a heart shape about two thirds width of tag as below

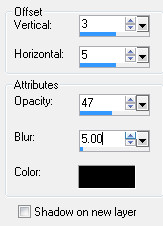
Go to effects/3d effects/drop shadow vertical/horizontal 2 opacity 38 blur7 colour black
Still staying on the heart layer use your magic wand and click on the outside of the heart
Go to selections/invert
Selections/modify/contract by around 6 this will differ slightly on yours because your heart maybe slightly smaller or larger we want as much of the heart as possible without going over the edge
Selections invert - DO NOT DESELECT YET
Copy and paste the ribbon as a new layer
Go to image / resize to 75%, bicubic, all layers unchecked
Move the ribbon down a little as per my tag image
Hit delete on your keyboard, the ribbon on the outer edge of the heart should now of disappeared. Now you can deselect by going to selections/select none
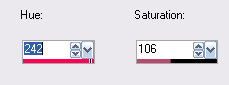
Go to adjust/hue and saturation/colourise and use the settings as below
Copy and paste your tube and resize as necessary . I have placed my tube slightly to the left of the middle of the heart see my tag above.
Add a drop shadow
Make your background colour white
Then select your text tool using the settings below
Font - Curlz MT size - 72 pixels Anti-alias - Sharp stroke width - 0 create as vector

Write out the word "but" then put it into position. Then write out the word "nice" and place that into position. When your happy of where they are and their size, go to layers/convert to raster layer
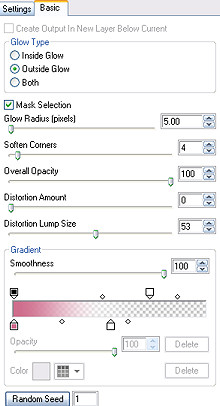
Now we want to add a glow to the text go to effects/plugins/eyecandy 5 nature/gradient glow and use the following settings
Duplicate this layer
In your layer palette , turn off the duplicated layer and select the original "but nice" text layer and
Then add a drop shadow of 2 2 38 7
Activate the smtbab-heartonchain.pspimage go to Edit/copy and then you may close down this image
Back to your working image and go to Edit/paste as a new layer
Move the pendant into position so that it looks like it is hanging off the letter C in the word nice
Activate your top layer which should be the duplicated text and turn the layer back on again.
Set your background colour to #cf6e8d. Foreground turned off
Select your preset shape tool and use the heart2 shape draw out a small heart shape in between the letter U as per my tag at the top.
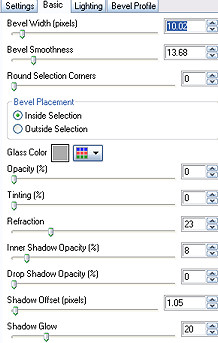
Go to effects/plugins/ eyecandy 5 nature/glass and use the following settings or use settings of your own choice
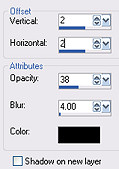
Now give the heart shape a drop shadow
Duplicate the heart layer 6 times and arrange them around the left hand side of your heart as per my tag at the beginning
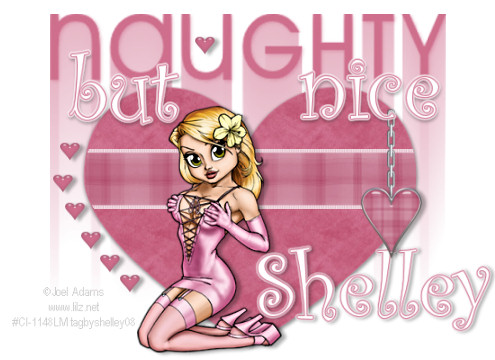
That's it we are all done. Don't forget to add all appropriate © information for the tube you used
If you want to add your name to the tag then I used Curlz as earlier in the tutorial at a size that is appropriate for your name to fit onto the tag and then added a drop shadow.
Hope you have enjoyed my tutorial .
If you have any queries please dont hesitate to contact me:-

Please feel free to link to this tutorial, and/or print it out for your own personal use, but do not copy it in any way to put on-line, pass out, or re-write without my permission. Any resemblance to any other tutorial like this is purely coincidental.
Please respect my work by not claiming it as you own.
**NOTE--You may do anything you like with your results from these tutorials except make a profit from them. You got your results for free so let's keep it that way. Thank you! :o)
Created 13th Jauary 2008. ©Copyright Tbab.co.uk
Property of Shelley Marlow
|
|