Created 9th May 2007. ©Copyright Tbab.co.uk
Property of Shelley Marlow
This tutorial is written
and made in Psp Version XI and assumes you have a working knowledge of Psp. It can be
made in earlier versions of Psp with a few adjustments, but for this tutorial I will
only be explaining how it was made in version XI.
You will need:-
Corel's PSP (free 30 day trial) which you can get here
Supplies - Includes mask JD-mask140, I did not make this mask, if anybody knows who did please email me so that i can give proper credit you can get it here
Tube of choice. Please respect artists work by only using images that you have permission to use.
I have used a tube by Joel Adams you need a licence to use his work which you can purchase here
Fonts - I used fonts called Impact and Juice ITC which came as part of my windows system. They are pay for fonts if you dont have them. If you dont have them use any fonts you like.
Plugins - DSB Flux/Bright Noise which you can get here
Toadies/Ommadawn which you can get here
Let's get started:-
Open a new image 400 x 400 pixels transparent
Flood fill with white
Layers/create new raster layer
Flood fill with #f8e2d8 or use a light colour from your tube.
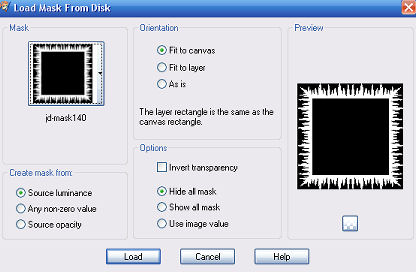
Layers/load save mask/load mask from disk
Select JD-mask140
In your layer palette, delete the mask layer
The pop up will say would you like this mask merged into the layer below it. Click yes
In your layer palette, highlight the top group layer and right click and merge/merge group.
Highlight your bottom white background layer.
Using your selection tool. Selection Type - Rectangle Mode - Add(Shift) Feather - 0 Anti-Alias checked.
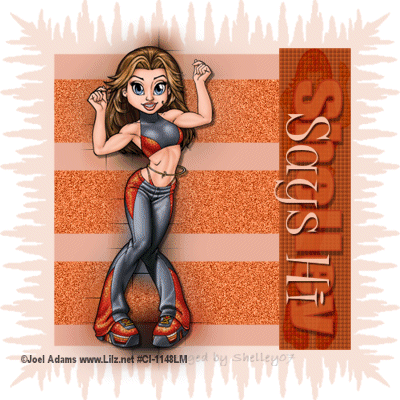
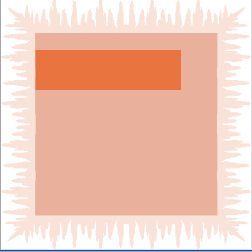
Draw out a rectangle in the centre of your work getting as close to the edge as you can like so:-

Go to selections /modify/expand by 4
Flood fill with #e9b09b
Select your top layer in the layer palette
Select your rectangle tool . Background colour #e9743f or a dark bright colour from your tube. Foreground colour turned off
Draw out a rectangle like so , doesn't have to be exact size, but keep it as close to the left hand edge of the inner square.
Right click on the layer and convert to raster layer.
Duplicate this layer twice so you have a total of three rectangle layers
Select your mover tool and move the two duplicate layers down so they are evenly spaced out. See main picture.
Turn off your bottom two layers.
Right click on one of the rectangle layers and merge /merge visible.
Duplicate this layer twice so that you have a total of three rectangle layers again.
Rename these three layers, Glitter1, Glitter2 and Glitter3
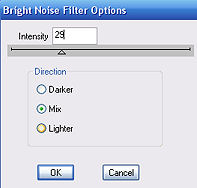
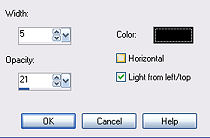
On the top layer go to Effects/Dsb flux/Bright Noise
Turn off your top layer . Highlight the second layer
Apply the Dsb flux plugin again using the same settings. But do it twice on this layer.
Turn off your second layer . Highlight the third layer
Apply the Dsb flux plugin again using the same settings. But do it three times on this layer.
Turn your bottom two layers back on and now make sure your very top layer in the layer pallette is now highlighted.
Select your rectangle tool , Background colour a little darker than the last colour you used for the other rectangles. I used #d15c27
Draw out a long thin rectangle on the right hand side of your work , see main image.
Right click and convert to raster layer
If you wish to alter it a little select your deform tool in Psp8 and 9 and the pick tool in Psp X and XI
Go to selections , select all, float, defloat
Create a new raster layer
Go to your tube and go to Edit/copy
Back to your tag and go to Edit/paste into selection
Selections/Select None
Change the blend mode to burn lower the opacity down to 30
Right click on the layer and merge down
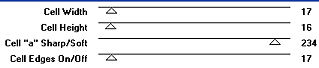
Go to effects/texture effects/blinds using these settings
Repeat the same texture effect again this time putting a checkmark alongside the horizontal
Copy and paste your tube onto your tag resize if necessary
Duplicate it twice so you have a total of three layers.
Turn the top two tube layers off and highlight the third tube layer
Go to adjust/Blur/Gaussian blur 15 using your deform tool or pick tool just stretch this layer slightly. Reduce the opacity to 48
Highlight the middle tube layer and go to Effects/Toadies/ommadawn
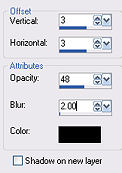
Highlight your top tube layer and add drop shadow
Select your text tool. Font - Impact size 72. Background colour - D15C27 or a darker colour from your tube. Foreground colour a little darker than the background colour you chose to use, I used B9361F
Go to Image/free rotate - Right 90
Using your pick or deformation toll , move into position and stretch as per my main image at top of the tutorial.
Convert to raster layer. Reduce the opacity to 77
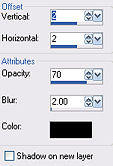
Add drop shadow

Again select your text tool, changing the font to Juice ITC. Turn your foreground colour off and change your background colour to a light colour from your tube. I used F6C0A9.
Go to Image/free rotate - Right 90
Using your pick or deformation toll , move into position and stretch as per my main image at top of the tutorial, this time though dont cover your previous text move it slightly to the left
Convert to raster layer.
Add drop shadow
Add your watermark on your work and add any releveant © details that are needed.
Save your tag. Keep your Psp open
Open Animation Shop (AS)
Go back to your psp.
In your layer pallette, make sure all of your layers are turned on and visible. Now turn off layers Glitter 1 and Glitter 2. Go to Edit/Copy Merged
Go back to Animation Shop. Edit/paste as a new animation
Back to Psp,in your layer pallette turn off glitter 3 and turn on glitter 2. Edit/Copy Merged.
Back to AS. Edit/paste after current frame
Back to Psp in your layer pallette turn off glitter 2 and turn on glitter 1. Edit/copy merged.
Back to AS. Edit/paste after current frame
Now save your animation.
If you have any queries please dont hesitate to contact me:-
Please feel free to link to this tutorial, and/or print it out for your own personal use, but do not copy it in any way to put on-line, pass out, or re-write without my permission. Any resemblance to any other tutorial like this is purely coincidental.
Please respect my work by not claiming it as you own.
**NOTE--You may do anything you like with your results from these tutorials except make a profit from them. You got your results for free so let's keep it that way. Thank you! :o)
Created 9th May 2007. ©Copyright Tbab.co.uk
Property of Shelley Marlow
|
|