
Created 30th March 2005. ©Copyright Tbab.co.uk
Property of Shelley Marlow
Today we will be learning how to take an image on a plain background, remove the background and learn how to tube it.
This tutorial is written
and made in Psp Version 9 and assumes you have a working knowledge of Psp. It can be
made in earlier versions of Psp with a few adjustments, but for this tutorial I will
only be explaining how it was made in version 9.
You will need:-
JASC's PSP (free 30 day trial) which you can get here
My Supplies - lily image which you can get here
The picture tube tool  allows you to paint images/objects without having to draw them. You can resize picture tubes down with the smallest effort. allows you to paint images/objects without having to draw them. You can resize picture tubes down with the smallest effort.
You can create tubes from more or less any picture you own or you have permissions to use. You can also download tubes from many places on the internet. Tubes can quite easily end up being an addiction for many psp'ers!!
Let's get started:-
Step One
Unzip the supplies file and open up the image1.jpg in your psp
Step Two
Go to Window/Duplicate.
Close the original so that you can use it at a later date if you wish, and keep open the duplicate for us to work on.
Step Three
Select your magic wand  and use the following settings and use the following settings

With your magic wand select all of the white areas, dont forget in between the stems as well. Your picture should look something like this

Step Four
On your layer pallette, make sure Background layer is highlighted, Right click background layer and click on Promote Background layer.
Now hit Delete on your keyboard. All the background should now be removed and we are just left with our flower.
Go to Selections/select none.
Step Five
We are now going to save this picture as a tube.
Go to File/Export/Picture tube
The following box will appear, because we are dealing with a single image we want to use the exact settings as below:-
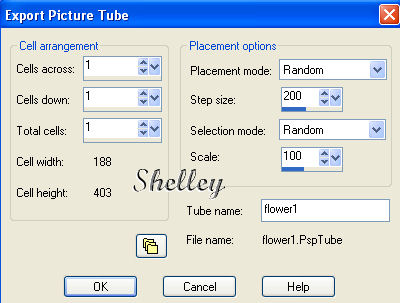
In the box next to tube name, give your file a name and then click ok.
Step Six
Open a new image 300 x 300 pixels, raster background transparent.
Set foreground colour to #F1C5E8.
Select Flood fill tool  and flood fill your image. and flood fill your image.
Select your tube tool
Category All and find your flower tube that we have just created and select it. Scale 68 just like below

Step Seven
Click on the centre of your image, and your flower tube should be placed on your background.
Add your name, save as a jpg and post to your group.

There now we are all done, congratulations you have just learnt how to tube a picture and then how to use that tube. Have a practise , remember what they say practise makes perfect.
For group tutorial purposes please use the materials provided
If you have any queries please dont hesitate to contact me:-

Please feel free to link to this tutorial, and/or print it out for your own personal use, but do not copy it in any way to put on-line, pass out, or re-write without my permission. Any resemblance to any other tutorial like this is purely coincidental.
Please respect my work by not claiming it as you own.
**NOTE--You may do anything you like with your results from these tutorials except make a profit from them. You got your results for free so let's keep it that way. Thank you! :o)
Created 30th March 2005. ©Copyright Tbab.co.uk
Property of Shelley Marlow
|
|
|
|