Beginners Simple Tag Tutorial
This tutorial was written by me on February 28th, 2008 and any
resemblance to other tutorials is purely coincidental.
You may use this tutorial for personal use only. Do not
distribute in other groups, post on a website or send
in email without express permission of me,
This is done in PSP XI but could probably be done
in other versions.
Please DO NOT script my tutorial.
For this tutorial you will need:
PSP XI or any other version. You can download a demo here. You may use your own image/tube or you may use the tube I used you can get it hereThe tube is © Allie - Snickerdoodles
OK…ready? Let's get started! Please be sure to save often.
1. Open new image 300 x 300 transparent image.
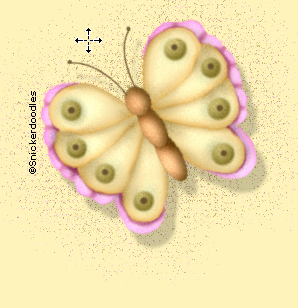
Open Tube/Image that you wish to use , or you may like to use the tube that I have included.
For your background colour select a colour out of your tube.
I used # FDF2BA. Foreground colour turned off.
Flood fill your new image
2. Select your tube , then go to Edit/Copy
(you may now close your tube)
Go to your working image. Edit/Paste as a new layer
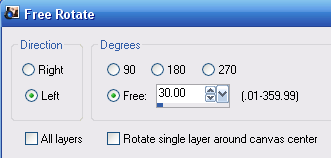
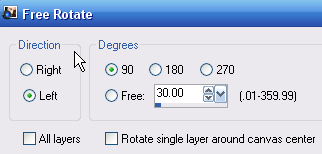
Go to Image/Free Rotate and use the following settings:-
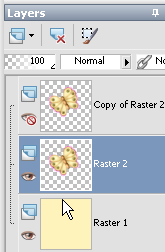
3. Using your move tool, move the tube layer up slightly. Then go to layers/duplicate.
Turn off your top layer which is your duplicate tube layer by clicking on the eye.
Select the 2nd layer (your original tube layer)
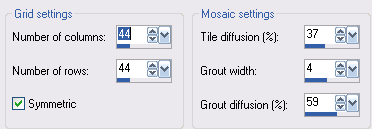
Go to Effects/ Texture Effects/ Mosiac - Antique use the following settings:-
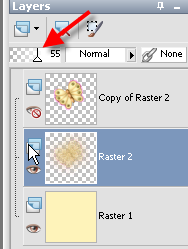
Lower the opacity of the layer by sliding the slider across to the left to 55
4. Select your top layer and unhide .
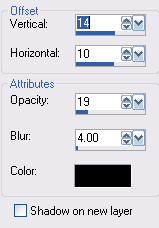
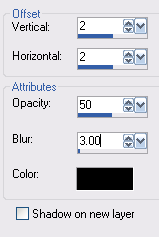
Go to Effects/3D Effects/Drop shadow and use the following settings:-
Any image that we use we must always give © credit for. You must always have permission
to use the artist's work or have paid a licence fee. The tube that i have included in this tutorial is free to use .
But you must include a copyright.
5. Turn your background colour to black and your foreground colour off
So lets select our text tool . Use the following settings:-
(please make a note of all settings)
Click on your work area and a text box will come up. Type in © Snickerdoodles.
To get the © sign hold down the Alt key at the same time as typing in the numbers
0169 and then let go of your alt key
6. In your layer pallete, right click on the vector layer and go to convert to raster layer
Go to Image/Free Rotate and use the following settings:-
Using your mover tool, move your text up alongside your tube. You should now have
something like this:-
7. Change your background colour to something bright from your tube.
I have used # F8B3E4
Select your Text tool again. Use the settings I have used below. Please make sure you make a note of
all settings including the anti-alias:-
Type out your name or other message.
In your layer pallette right click on the vector layer and convert to raster layer
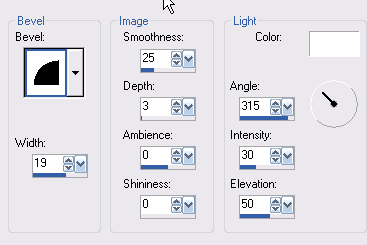
Go to Effects/3D Effects/Inner Bevel and use the following settings:-
Go to Effects/3D Effects/Drop Shadow and use the following settings:-
Adding a Border to our Image
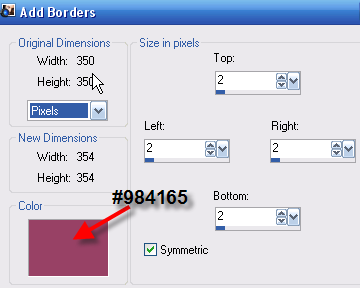
8. Go to Image/Add Borders.
2 pixel border in a dark colour from your image.
Here is what i used:-
Go to image/Add Borders
10 pixel border, use the same colour you used for your name
Go to Image/Add Borders
2 pixel border in the same dark colour you used before
9. Using your magic wand. Select the lighter colour in the border we have just made
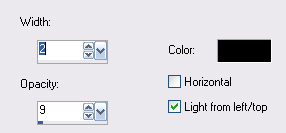
Go to Effects/Textures/Blinds and use the following settings:-
Keep selected, go to Effects/3D Effects/Inner Bevel and use the same settings
as we used for the text.
Selections/Select None
Save as jpg.
Congratulations you have just made your first simple tag!!!
I hope you have enjoyed this tutorial.
If you have any comments or questions, please email me here.
Copyright © 2008 Shelley Marlow
All Rights Reserved
|