Easy Framing
This tutorial was written by me on March 3rd, 2008 and any
resemblance to other tutorials is purely coincidental.
You may use this tutorial for personal use only. Do not
distribute in other groups, post on a website or send
in email without express permission of me,
This is done in PSP XI but could probably be done
in other versions.
Please DO NOT script my tutorial.
For this tutorial you will need:
PSP XI or any other version. You can download a demo here.
Supplies :- which include an image which is © to sxc.hu - you may visit them here
also a corner tube. Unfortunately I cannot remember where this came from.
(If this belongs to you please contact me so that I may give correct credit)
You can pick up the supplies here
Font - Wedding Bliss ES which you can get here
OK…ready? Let's get started! Please be sure to save often.
1. Open image in the supplies folder or an image of your choice
Windows/Duplicate (keep your original open for now but minimise it)
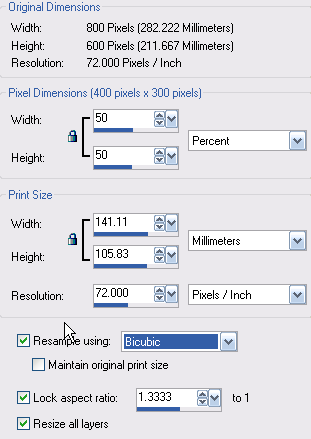
2. Lets work on your duplicated image
Image/Resize as per my screenshot
Adjust/Sharpness/Sharpen
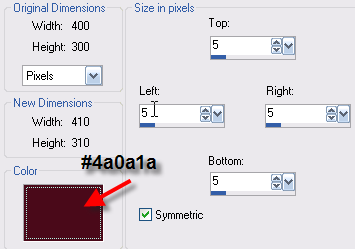
3. Image/Add Borders
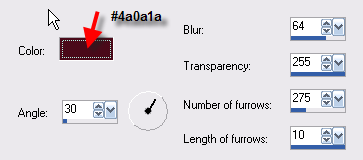
Using your colour picker choose a dark colour from your image.
I used #4A0A1A
add a 5 pixel border
Using your magic wand select your border
Selections/Invert
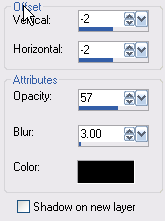
Effects/3D Effects/Drop Shadow
Duplicate the above settings changing horizontal and vertical to -2 (minus 2)
Selections/Select None
4. Image/Add Border of 2 pixels colour - White
Image/Add Border of 20 pixels colour - Your dark colour or I used #4a0a1a
Use your magic wand select your dark border
(Tip:- When selecting many of your tools eg the magic wand.
If you have not changed the settings since using
it previously then the settings will remain the same)
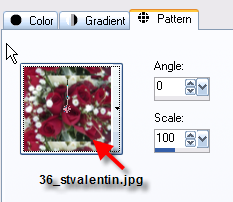
Go to material pallette and select your patterns/ then select your original image
Flood fill your border area
Go to Effects/Textures/Fine Leather
Selections/Select None
You may now close the original Image that came with the supplies. It is no longer needed
5. Image/Add Border of 5 pixels using your dark colour
Selections/Invert
Effects/3d Effects/Cutout
Go to layers/add new raster layer
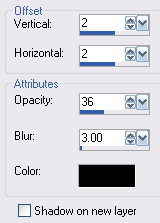
Repeat the cutout changing the vertical and horizontal settings to -2 (minus 2)
Selections/Select None
In your layer pallette right click on your top layer and go to merge/merge down
6. Image/Add Border of 2 pixels colour - white
Image/Add Border of 35 pixels colour - your dark colour
With your magic wand select the new dark border
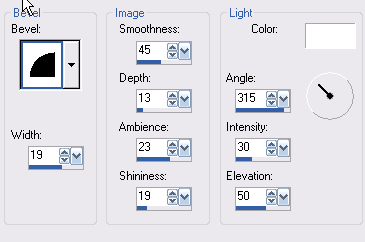
Effects/3d Effects/Inner Bevel
Selections/Select None
7. Open your corner tube from your supplies
Edit/Copy
Edit/Paste as a new layer on to our working image
Using your mover tool, place in the top left hand corner of yoru bevelled frame
as per my main image at the top of this page
Go to Effects/3D Effects/Drop Shadow
Layers/Duplicate
Image/Mirror
Image/Flip
In your layer pallette right click on your top layer go to Merge/Merge all (flatten)
8. Select your text tool and use a nice script font of your choice or
you may use the one that I have used and supplied the link for
at the beginning of the tutorial
(please take note of the stroke width that I have used)
In your materials pallette select foreground as your dark colour or I have used #4a0a1a
background - white
Type out your message or your name
Move your text into a position that you like
Layers/Convert to raster layer
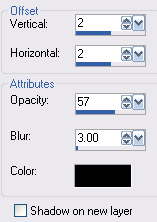
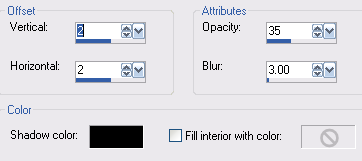
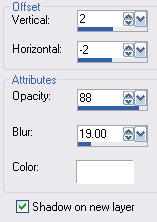
9. Add drop shadow take careful note of my settings
In version PSPXI when you add a drop shadow on a new layer, it will lock the layer
together with eg. in this case the text layer. You many not need to do the following step if your
layer pallette doesnt look like my screenshot below . If it doesnt look the same as my
screenshot then go to Step 11.
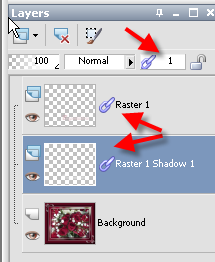
10. Because it has locked the two layers together we need to unlock them so that we can still work
on the text layer.
In your layer pallette, make sure you are on the middle layer
Can you see where my arrows are pointing to that there is an icon that looks like a chain link
You will see the very top arrow is pointing to the chain link icon and the number 1
this means that one original layer is linked to one other layer.
If you look at the second and third arrow they are pointing to two layers
Raster 1 layer which is our original text layer and then Raster 1 Shadow 1 layer which
is our shadow layer.
Now you understand briefly what it means , while on the middle layer I would like you to click
where the first arrow is twice until it reads None the link icon will now disappear alongside this layer
Now click on your top layer and do the same thing.
There we have now removed the linking effect
11. Staying on the top layer go to Effects/3D Effects/Drop shadow
Please note the checkmark is removed from shadow on new layer this time
Go to layers/merge/merge visible
Make sure you put your watermark on your work
Please place any © information that is needed on to your work also
Save as jpg. You are all done!!!
I hope you have enjoyed this tutorial.
If you have any comments or questions, please email me here.
Copyright © 2008 Shelley Marlow
All Rights Reserved