This tutorial was written using PSP 9 and presumes you have a working knowledge of psp.
You will need the following supplies :-
Jasc psp version 9. You can download a trial version
here
The pumpkin tube which you can find
here.
If anybody knows who the artist is for the tubes I have supplied or you are the artist and would like © please let me know . I received them in good faith from websites offering them for free download.
Ok lets get started, Open a new canvas 800 x 200, transparent background, don't worry about the size we will crop it down later.
Click on your text tool, use a rather chunky font I chose Comic Sans, size 50, stroke 2.0. Set your foreground to #e0ca10 and your background to #e06b24
Create as vector checked, Now click on your canvas and type your name, Convert layer to raster, position where you want it,
If you wish to stretch it out a little to make it more chunky feel free to do so using raster deform tool.
Click on your warp brush and use the settings below.

Now be creative drag, pull, push your letters until you get an effect that looks spooky.
Selections, select all float, defloat, duplicate this layer twice, layers, dupicate, so you have a total of 4 layers.
3 text layers and the original black layer.
Now x out your original layer and highlight one of the other layers to make it active, grab your flood fill tool and fill this layer with one of your colours.
images, resize 110% all layers UNchecked. Now highlight the other duplicated layers and flood fill with the opposite colour, Images, resize 120% all layers UNchecked. Now arrange the layers so the largest is at the bottom then the medium size text and then your original text is on the top.
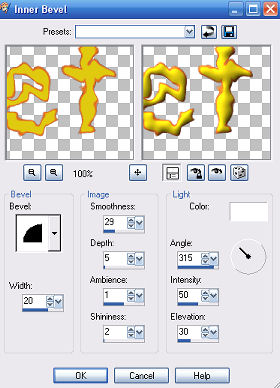
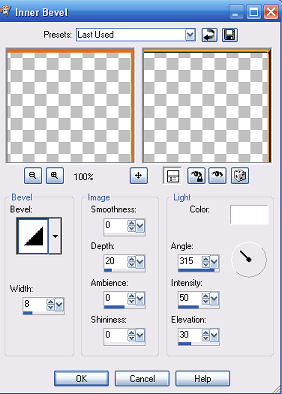
Back to the original text layer we need to give this some depth so click on effects, 3d effects, inner bevel and use the settings below.
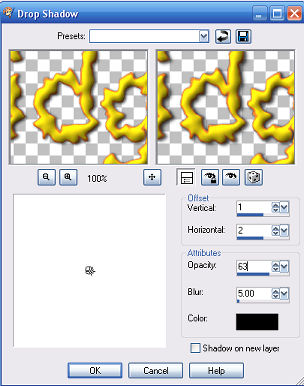
Now to add a drop shadow to this layer again go to effects, 3d effects, drop shadow and use the settings below.
Now apply the same drop shadow to the other 2 layers. Merge, merge visible and thats the text done pretty simple eh?.
Ok now to add the background and the border
Layers, new raster layer, flood fill this with black and move this layer to the bottom so now your text is sat on top of it.
layers, merge, merge visible.
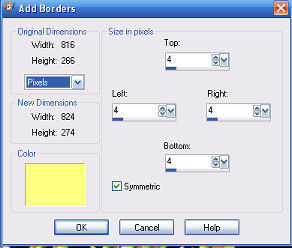
Click on Images, add borders click ok on the box that may pop up. Use the settings below for the first part of the border.
You may use any colour in the box as long as it is not a colour that is in your image I chose a pale lemon.
Grab your selection tool and click into this border, flood fill with the yellow we have been using. selections, select none.
Images, add borders leave settings as they are again click inside this with selection tool and now flood fill with the orange.
Keep selected, click on effects 3d effects, inner bevel and use these settings.
Select none, again Images, add borders and this time change the size to 8, select and flood fill with the yellow, selections, select none.
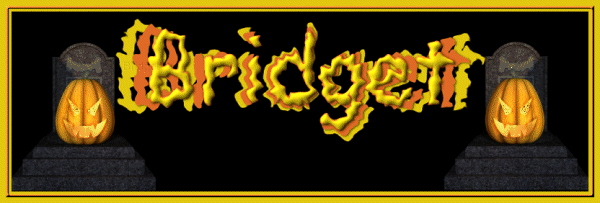
Thats the border done. Save your tag as a psp file for future use. There you go now you can add tubes or anything else you wish the possibilities are endless.
If you wish to add noise to your tubes once added here are the steps for the noise I added to my pumpkins eyes.
Duplicate the tube you have used twice so you have a total of 3 tube layers grab your selection tool and select the areas you wish to add noise to.
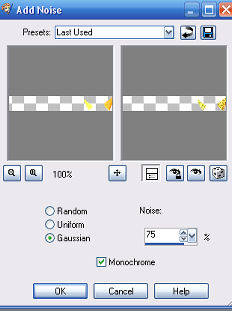
Keep selected and click on Adjust, add/remove noise, add noise and use these settings.
Now click on the second tube layer and repeat above instructions only changing the noise level to 85. The third tube layer should be set at 95.
X out 2 of your tube layers and highlight the background layer. right click copy merged, open animation shop.
Paste as new image, go back to psp x out the tube layer you just used and un x one of the others. copy merged back to animation shop, edit, paste, paste after current frame.
Back to psp x out the tube layer you just used and un x the last tube layer again edit copy merged, back to animation and edit paste after current frame. Now if you wish to crop the size of this click on edit select all, animations, resize animation and crop to the size you require I cropped mine to 600.
View animation and save as a gif.
Hope you enjoyed this tutorial, Thank you for trying it.